

From a 21st century perspective, the Airfix Dornier Do217 was ahead of its time. Mixed messages, confusing instructions and a baffling array of choices. Key facts they forgot to tell you, dubious information presented with great confidence. It has (some of) the faults the MiG-15 had, and adds some extra, just for you.
The original Airfix Dornier Do217E-2 appeared in 1960, then got reissued in 1963 with this packaging. It was repeatedly modified and repackaged, with a night fighter option and all sorts, continuing to evolve into the 21st century.
This wasn’t my first or even second attempt at an Airfix kit. Which was probably fortunate, given the perplexing instructions – it looks challenging even now, as an alleged adult. I’m amazed I ever finished the thing at primary school age, but I was full of misplaced optimism in those days.

Mixed messages
Everything looks promising until you actually try to build the model. No doubt the person writing the instructions did their best, but someone forgot to tell them about the pocket money market. ‘Pocket money’ suggests an early stage of education – around our way, quite a few primary school children bought Airfix kits in the 60s.
But whoever wrote the Do217 instructions seems to assume you are well informed about aeroplanes. And a good working knowledge of the English language. Elevators, bulkheads, ailerons; port and starboard instead of left and right. This might spark curiosity to learn about aviation – or more likely just cause unnecessary confusion. This definitely reads as if the writer expects you to be familiar with the terminology:

About 1968 someone at Airfix realised that these complicated written instructions were unnecessary. If they moulded the part numbers next to the part on the sprue, all you would need is the diagram. Which is ideal for someone with a reading age of 8 (for example an 8-year old). Plus a few basic instructions like “don’t squirt glue in your eye” which can easily be translated for the overseas market.
All possible assistance short of actual help
Before you can even start, you need to identify some very small parts – based on small drawings of what those parts should look like. In reality, we get 1/72 representations of a scaffold pole, some sort of short stick, or a blob on a stick. Aerials – little blobs on sticks; machine guns – subtly different blobs on sticks.

Part 20 (third from the right) looks like some 50s sci-fi device but is supposedly a cannon. (Probably a 20mm MG FF cannon, which doesn’t actually belong on this particular aircraft. This is what it should look like in real life, on a Do217E-2. If you sort of squint and try hard, there’s a likeness) The “control column” wouldn’t look out of place in a scale model industrial mixer.
Moving parts. Or perhaps not.
There are also some very ambitious ideas about moving parts in your finished model. Moving parts and glue are potentially not a winning combination. You need to keep glue well away from anything which is supposed to move. There are only very small gaps between the moving and static parts. So that means you need to apply the glue with great precision and a steady hand. Glue straight out of the tube gets in places where it has no business to be. And takes a while to set, so by the time you find out, it’s too late – the proverbial sticky end.
The instructions don’t give us a helpful tip like, “apply a tiny drop of glue to a cocktail stick and carefully apply glue to the non-moving parts”. They just say “ENSURE NO CEMENT COMES INTO CONTACT WITH…” whatever the moving part is. Upper case shows this is REALLY IMPORTANT, which is unnerving and unhelpful if you don’t know how to “ensure” it. Much like being shouted at in a foreign language you don’t understand.
Meanwhile, some of the equivalent port and starboard parts are subtly different. Good luck telling those apart until you start to stick them in place, when it becomes obvious that they don’t fit. And it gets messy – traditional solvent based glue really does dissolve the plastic and is great for making fingerprint impressions.

More options than the human mind can cope with
There’s also a preview of the 21st century illusion of choice for consumers. Lots of options, but not enough information to make an objective choice. The instructions give no guidance on appropriate options e.g. undercarriage up or down? The undercarriage doors are permanently stuck open or closed, so why have the option of moveable undercarriage? How about some suggestions about what position the moveable ailerons, elevators and rudders should be in? This is supposed to be “just like the real thing”, after all.
Other options relate to the dive brakes, which reduce airspeed in a dive – this time the meaning is literal. The dive brakes formed part of a long tailcone; conversely, a short tailcone meant the aircraft wasn’t fitted with the dive brakes. The tailcone wasn’t exactly conical, but that’s not important right now. For now, let’s not go too far down this particular rabbit hole. Trust me, it can get more complicated.
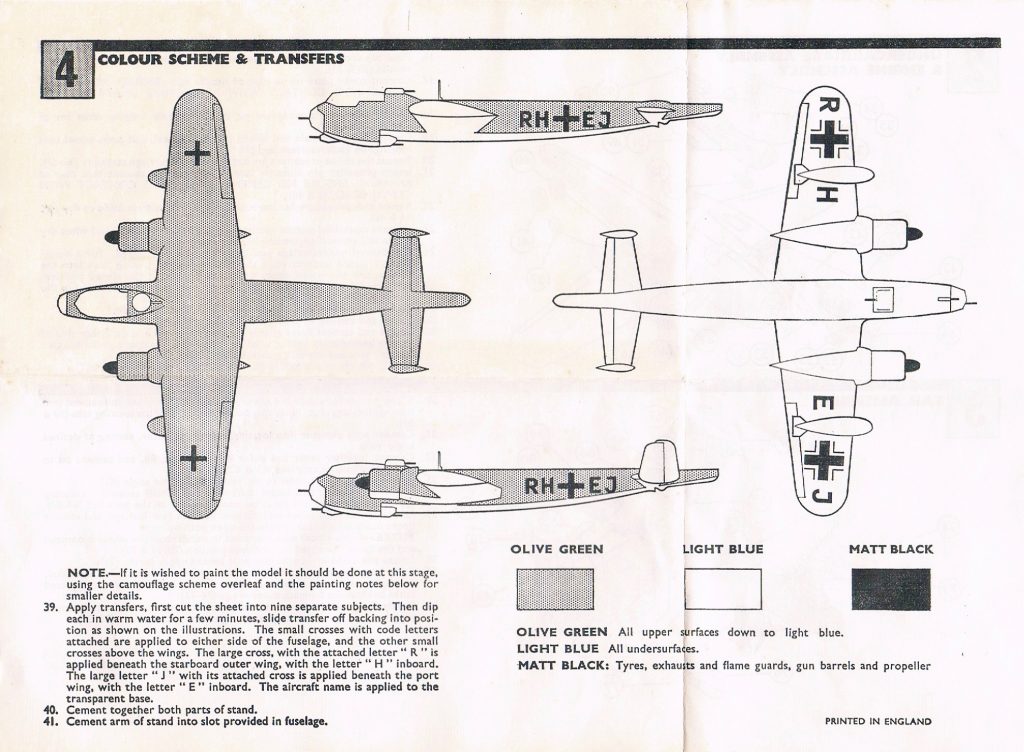
There are optional parts (78-81) for long and short tailcones, but just one set of markings for one aircraft. So in real life, this aircraft had either a long or a short tailcone at any point in time. Photos show an actual real world aircraft with the kit markings and a long tailcone. The painting instructions show a long tail but the (imaginative?) box art suggests a short tail. The instructions just tell us to select “the desired tailcone”. The tail cones were apparently swapped out in operational service but some sort of guidance might help. Otherwise why bother having optional parts? And as Tina Turner might have said, what’s “desire” got to do with it?
Drama 3: Accuracy 1

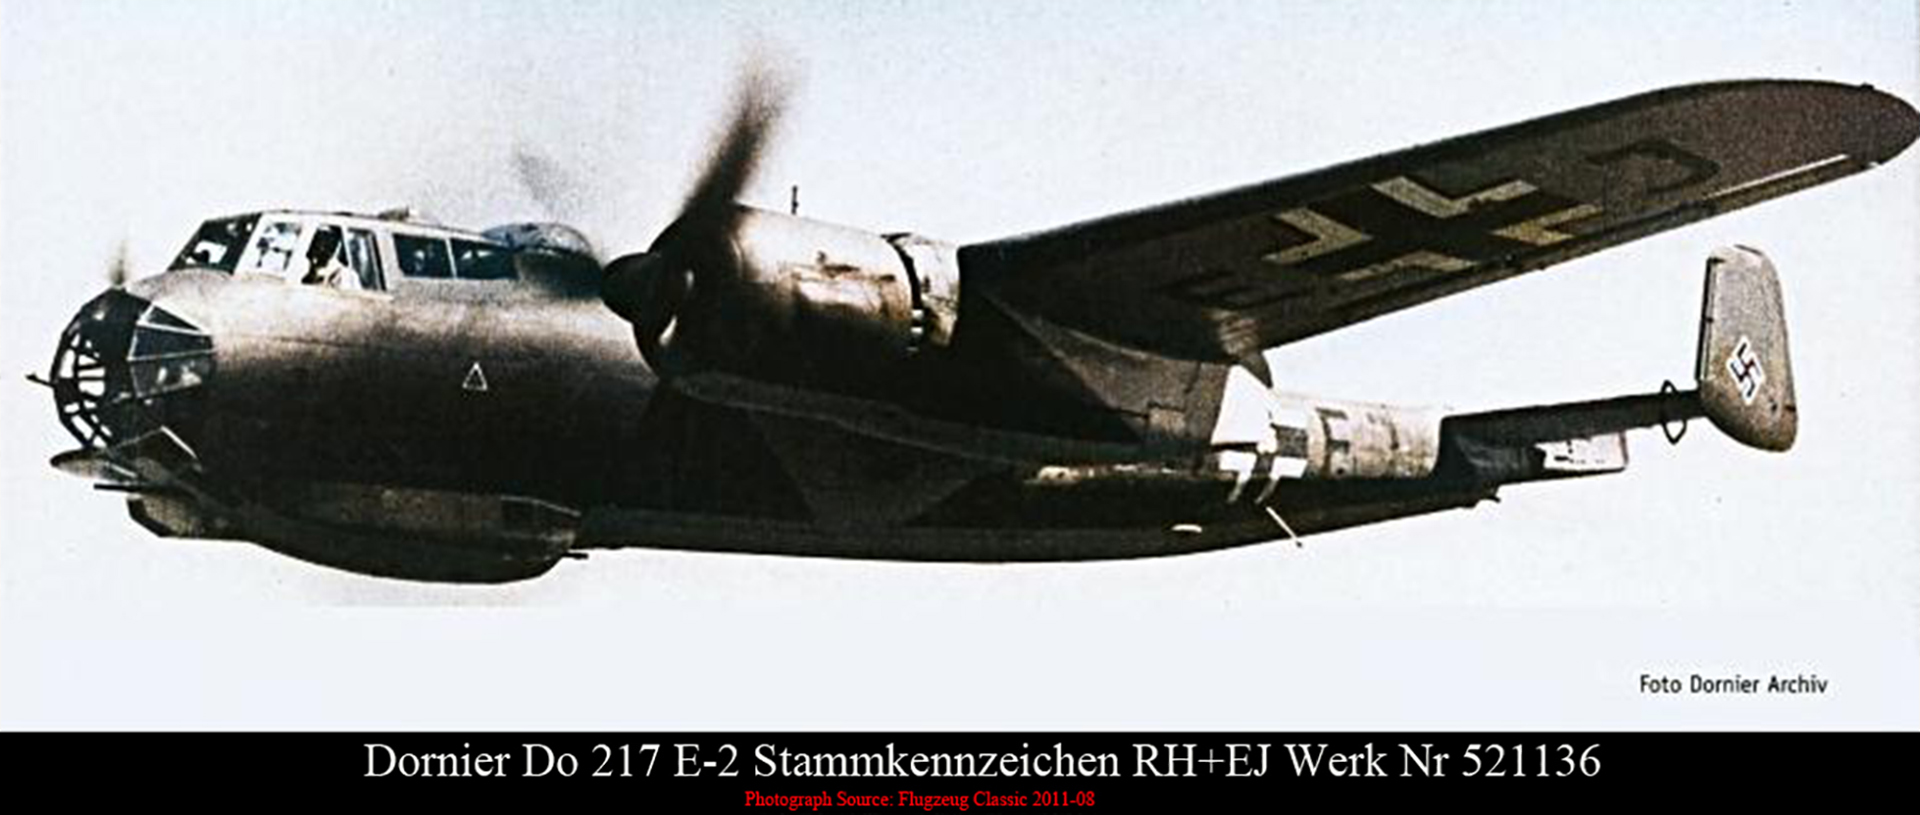
Presumably Airfix chose this particular subject because photos were available (although the finished model looks different in detail).
The kit decals are a fair attempt at the markings of this early production Do217E-2 (Werk Nummer 1136). The dramatic box art suddenly loses credibility once you discover these are the markings of a trials aircraft. It would basically be flying up and down trying to avoid any sort of drama. Unless this was the real life inspiration for the bit in Catch-22 where they bomb their own airfield.
Airfix simplified the colour scheme to a single shade of green on the upper surfaces instead of some attempt at the correct two-tone camouflage. Perhaps they finally remembered the pocket money market when they wrote page 4. (It should be the RLM72/73/65 maritime scheme, if you’re interested. To be fair, the two greens looks low contrast in photos). The painting instructions show a “light blue” fin/rudder, while the box art correctly suggests some sort of green.
Looking for a few details and pictures of the real aircraft turned into a real rabbit hole. I now have a growing collection of books about the Do217, including one written mostly in Japanese (which is not so helpful).
What the Airfix Dornier Do217 teaches us about life
So the Airfix Dornier Do217 teaches us several lessons about life. Modern life, even. Firstly, you often get instructions which are ambiguous and confusing. Mixed messages.
Secondly, as the song says, it ain’t necessarily so. Apparently well-informed people will tell you stuff which isn’t right.
Thirdly, apparently simple questions don’t always have simple or straightforward answers. Just more questions.
Hi, i went to a model convention a few years ago and bought the 1978 version of this one; really excited about building my first nightfighter. When i got home to my surprise there where two of this in the box. So Iactually got a 2 for 1, hehehe. The second one, i really dont know which year release was it. However it inclueded the same old instructions posted here, or very similar and the same decals (RH+EJ). On the other handmy instructions had a print mistake and stated the upper colour as “light blue” and the bottom one as “olive green”. I had a lot of fun building this planes, i also have to add that i bought the version from the 90s which allows you to build a mistel; instructions way better but same mould :/.
Just a question is that piece in the front cristal part suposed to be a cannon? or an antenna? Because those “things” on the ” gun-barrel” confuse me, if its a gun they should be removed right?
Cheers
Hi Josef, thanks for that – there are still some Airfix kits from really old moulds on sale, like the DH88 Comet. That was a bonus finding an extra kit in there, the original box was pretty small and there was only just about room to fit one kit in there. I think I enjoyed building the original Do217 kit back in the day but once was enough…
To answer your question, for the aircraft in the kit markings those “things” should be removed. I thought that perhaps Airfix were trying to represent a 20mm MG FF cannon, which has what looks like a sight on the outside: http://airwar.ru/image/idop/bww2/do217e/do217e-15.jpg
However that’s not the correct cannon for the Do217E-2 in the kit markings – should be a machine gun, not sure which type. http://airwar.ru/image/idop/bww2/do217e/do217e-18.jpg
Hope those links work OK.
All the best, Colin
Hi again, the nose mounted machine gun should have been an MG15, just like the guns mounted in the cockpit side windows.